


Network Basics
How to setup your network for homelab-ing 101

The most common way you will likely be regularly accessing and controlling your services is via SSH. SSH allows you to connect to your servers or virtual machines via command line, by default using a username and password combination that will be defined during the setup of the host. To enhance security, we will migrate the SSH authentication method to a private certificate, and disable password access.
By generating your certificate chain, you will be provided with a public and private key pair. The private key will remain on the device you generate it from and intend to access your other hosts, whilst the public key will need to be transferred to the host devices for authentication. GitHub provides both instructions on how to generate this pair, and the ability to host your public key through your GitHub profile for later access.
ssh-keygen -t ed25519 -C "your_email@example.com"
$ eval "$(ssh-agent -s)"
> Agent pid 59566
ssh-add ~/.ssh/id_ed25519
We now have a public and private key chain, and our private key loaded on our local SSH agent.
Next we need to ensure our public key is loaded on our host devices, to allow for certificate based authentication. One of the simplest ways to achieve this is to load your public key onto your GitHub profile, which can then be used to download to host machines. Steps to add your public SSH key to your GitHub profile are available here.
Once loaded, your key(s) will be available at the following endpoint:
https://github.com/username.keys
On your host machine, you can now download the public key to your authorized keys directory, updating this with any new keys you may have added to your profile.
curl https://github.com/username.keys >> ~/.ssh/authorized_keys
Finally, we now want to enable certificate authentication, and disable password authentication, meaning that only users with a valid certificate pair can SSH into the host.
nano /etc/ssh/sshd_config
PasswordAuthentication no
PubkeyAuthentication yes
PermitRootLogin no
systemctl restart ssh
You will now be able to login to your host devices without the need to enter a password, making the process far simpler, and also more secure.
In order to maintain the security of our environment, we need to ensure we have the ability to monitor it for consistency and change. To achieve this, we will deploy a monitoring service that can be used as a central point of reporting and visibility into our environment. In this case, I will be deploying the Checkmk monitoring solution, but other popular choices for homelab environments include Zabbix and Uptime Kuma.
To setup a checkmk monitoring environment, we require two parts - the host server for checkmk raw, and the checkmk agent which will be deployed on devices we want to monitor.
Checkmk server can be configured on a range of linux environments, for my purposes I will be using a Debian 12 based LXC.
wget https://download.checkmk.com/checkmk/2.2.0p23/check-mk-raw-2.2.0p23_0.bookworm_amd64.deb
apt install check-mk-raw-2.2.0p23_0.bookworm_amd64.deb
omd version
OMD - Open Monitoring Distribution Version 2.2.0p1.cre
A comprehensive guide for configuration options for checmk can be found here.
Now that our checmk server is up and running, we need to install the agent application on devices we want to monitor. We can start with the host of the checkmk server itself.
scp /local/path/check-mk-agent_2.3.0b1-1_all.deb checkmk-server@host-ip /remote/path
apt install /local/path/check-mk-agent_2.3.0b1-1_all.deb
You can repeat this process for as many hosts as you wish to monitor within your environment.
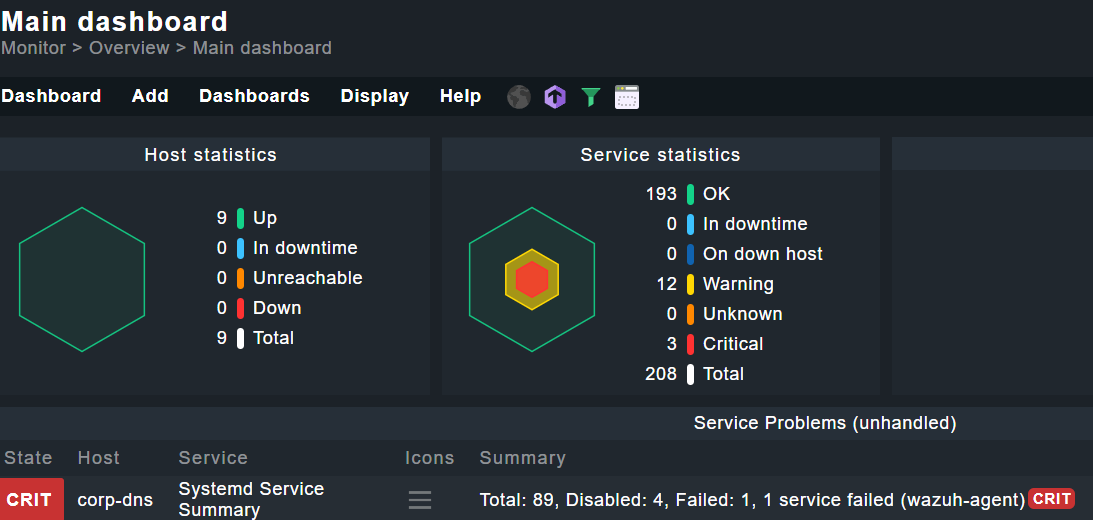
With checmk now configured, you will have access to the default dashboard highlighting any service problems or events that have taken place. Regularly checking in here and addressing any problems, or monitoring events for changes within your environment will ensure you are across what is happening in your homelab.
How to setup your network for homelab-ing 101
How to safely enable access to your services from anywhere
Using automation to make homelab security efficent